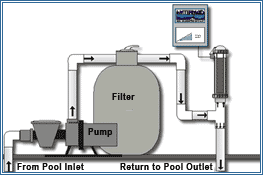
The instructions given here for the installation of the pool salt chlorinator is a condensed version of the detailed instructions given in the Owners Manual. It is recommended that you refer to the owner’s manual if you have any questions about the installation.
 You can view the condensed installation manual, please click here
Although full pool salt chlorinator installation instructions are supplied with every unit, Watermaid Canada recommends that a licensed electrician and plumber be used to install this equipment, to ensure safe and trouble free performance.
 Filling The Salt Water Chlorinator
What Type of Pool Salt
In Canada we suggest a clean form of water softener salt or fine grind pool salt found at pool shops and hardware stores. In coastal provinces sea salt may be a cheap and easy way to add salt to your pool.
Where to Add Salt
Salt is simply poured into the pool to get the start up level required. If your pool has a jet on the step, it is best to dump it onto the step and allow the water flow to dissolve the salt quickly. If you do not plan to swim right away, it can be dumped into the shallow end of the pool and brushed around to speed the rate at which it dissolves. If you want to swim right away, put the salt in the deep end of the pool. In a vinyl lined pool there is a risk of tearing the liner if a large piece is stepped on. In the deep end, the it will take longer to dissolve (as much as 2 days for water softener salt)
How Much Pool Salt to Add
Watermaid recommends a level of 6000 parts per million (PPM). This level closely matches the level of our bodies (9000 PPM) without the pool tasting too salty.
To initially start a pool with the correct amount of salt, add it to the pool at the rate of:
6 grams / 0.006 Kilograms for every 1 Litre of water
or
0.22 ounces / 0.05 Pounds for every 1 US Gallon of water.
PLEASE NOTE: If it is an existing pool that has been running on chlorine or bromine, test the salt in the pool before adding any more. It is common to have a salt level of 2000 – 3000 ppm already. These compounds are salt based and accumulate in the pool.
 Installing the Saltwater Chlorinator
Electrical Connection
The Watermaid power pack MUST be wired so that when the pool pump comes on the Watermaid unit is powered. If the unit is not wired with the pump, damage to the cell and or power pack will result and the warranty will be void.
Watermaid has units for 120 volts and 240 volts. Please ensure that you check the pump supply voltage and match your unit to the available power.
To make installation easy, the Watermaid unit is supplied with a “Liquid Tight” connector for use with flexible PVC conduit.
Mounting the Power Pack

The power pack is simply hung on a stainless steel bracket, which is secured to the wall or similar vertical surface.
Mounting the Venturi Assembly
The Venturi is mounted in the pipe work after all other equipment and before any diversions to waterfalls or other equipment. Ideally the venturi is located 5 feet from and below the outlet of the heater. The cell may be installed closer to the heater but operational cautions MUST be observed or damage to the cell will result. Please ensure that the heater is off for a minimum of 5 minutes before switching the system pump off to allow the heater core to cool. If this cool down period in not observed, the heater may super heat the water in its core and damage the pipes and the chlorinator cell with the excess heat This damage is NOT covered under warranty.
To start the system for the first time, ensure that the proper salt level is in the pool and dissolved. Select 100% output on the unit and leave it at this setting until the free chlorine levels in your pool start to climb over 1 ppm. At this point, you can start reducing the unit output to prevent over chlorination of your pool.